Fix it with D-Vision: Make problem AVIs work on DVP642
Suppose you’ve got yourself an AVI file. It looks great when you preview it on your Mac, but is utterly rejected when you play it on your DVP642. Obviously, there’s something in the file that the player doesn’t like.
The picture flickers, the colors aren’t right, the resolution isn’t supported, or maybe it just doesn’t play at all.
It could be that the file uses an incompatible codec or was encoded using unsupported options, such as QPEL or GMC.
Don’t worry though. All is not lost; that file can be made playable by a piece of free software.
If I haven’t mentioned it before, D-Vision is a very useful program for a Mac-based video encodista to have on hand. It’s essentially a graphic wrapper for mencoder and mplayer, giving easy access to advanced encoding options. Not only does the program create AVIs, but it features a number of useful tools for manipulating AVI and MPEG files.
There’s one for splitting AVIs, one for joining them, one adding an audio track and more. But the tool we’re interested in the the "Re-encoding" tool.
Here’s how to take that troublesome video and make it play nice with your DVP642.
Converting an existing AVI for use on DVP642
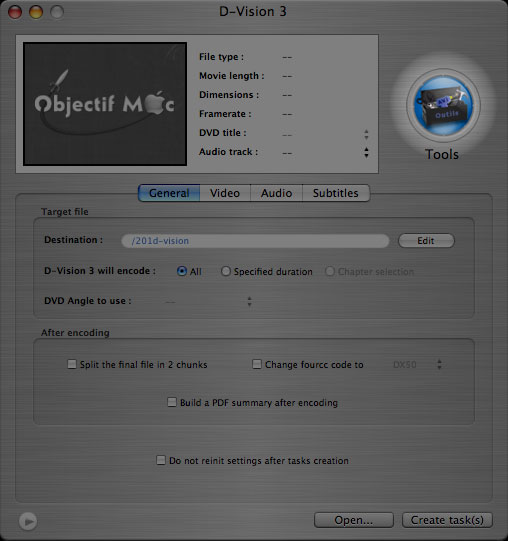
Launching D-vision brings you to its main encoding window. This is for creating DivX and XviD AVIs from scratch. It only supports un-encrypted DVDs and Video_TS folders. We’re interested in re-encoding an existing AVI, so click on the Tools button.
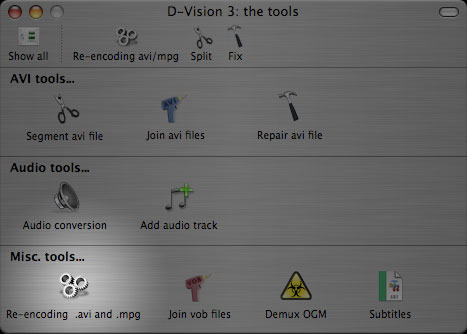
Under Misc. Tools, click Re-encoding .avi and .mpg to bring up the re-encoding options.
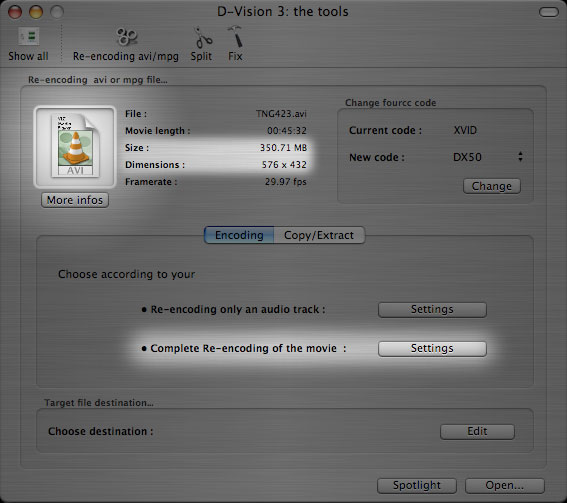
Drag your errant AVI to the white square. Make note of the file size and dimensions, then click the Complete Re-encoding of the movie Settings button. In my sample video, the size is about 350 MB and the picture resolution is 576 x 432.
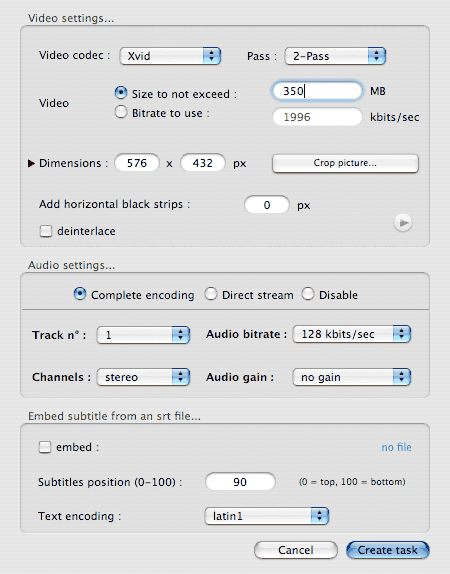
Use the settings palette to configure your new AVI file. The most important thing is that the codec MUST be set to Xvid for the resulting file to work on the DVP642. I know it seems a little backwards, but D-Vision’s Divx 3 and Divx 4 don’t work on the player.
Next, choose the number of passes. 2-pass will take twice as long to encode but will result in a better looking picture.
You can adjust the file size of the output video to be smaller or larger than your original if you like. It doesn’t make much sense to increase the size of your video; you don’t gain any quality from it. So at most, put it the original’s size (350MB in my case) in the field next to Size to not exceed.

The file dimensions will automatically match those of the original. To change the resolution, click on the black triangle to bring up a menu. If the width is not already 576, I recommend selecting it. If you want a custom width, or if the aspect ratio of your source file is not 4:3 or 16:9, manually enter the width on the left and select Calculate height respecting ratio.
Under audio, you can choose to keep the existing soundtrack by clicking Direct stream. If the original file has more than one audio track, select the one to include in your output from the Track n° menu. Unfortunately, if the original file has more than one audio track, the others will have to be added separately.
Alternately, you can convert the audio to MP3 by selecting Complete encoding and adjusting the options below it. If you don’t want any audio at all in the output file, select Disable.
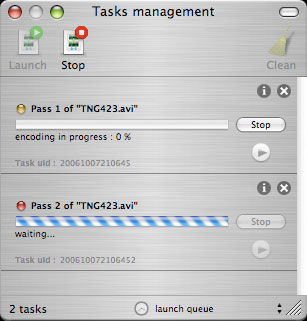
When you’ve got everything set up the way you like it, click Create task. D-Vision’s task manager will pop up. Click Launch to start the encoding process.
Before and After
When D-Vision is finished, you’ll have a brand new AVI file ready to play on your DVD player. Quality-wise, how does the new file compare to the original? Check out the screen shots below for a before and after comparison.
The top image is from the original DVDrip. It resolution is 576 x 432, and it is encoded using XviD with a video bitrate of 935.5 kbps. It was encoded using QPEL, GMC and a custom MPEG matrix. There’s no way the DVP642 will play it. The file is 350.7 MB.
Below it is the reprocessed version from D-vision. This file is the same resolution, still encoded with XviD at a video bitrate of 928.1 kbps. The file size is 348.3 MB.
Overall, the re-encoded version looks exceptionally good in my opinion. There’s not much in the way of encoding artifacts or macro-blocking. In fact, the new version loses some sharpness, resulting in a slightly softer image that looks less noisy than the original. Also notice how the color bleeding around Data’s collar is eliminated, as is the halo from the black part to the yellow part of his uniform.
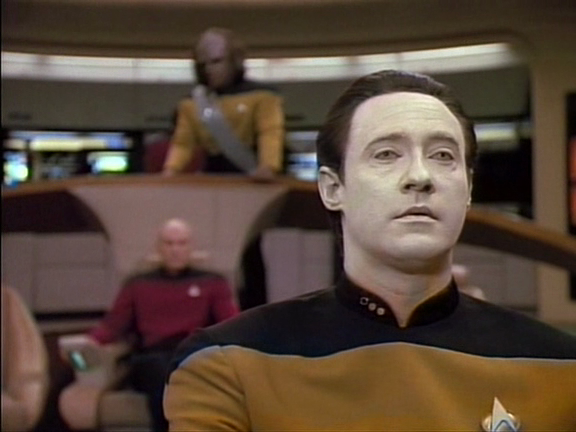
Original XviD file with QPEL, GMC and a Custom Matrix. No go on the player.
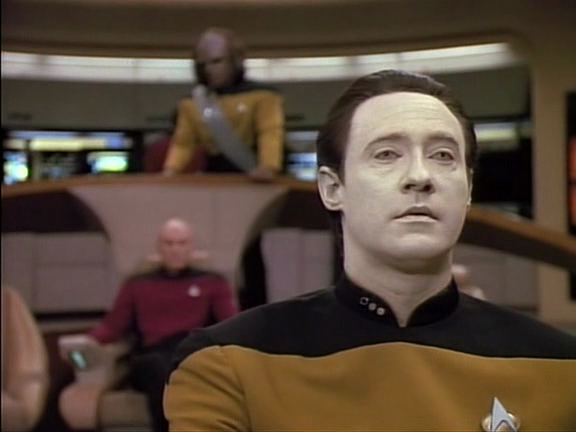
D-vision re-encoded file that works on DVP642.
I’d call that a keeper. Burn it to a disc and enjoy it on your Philips DVP642.
4 Responses to “Fix it with D-Vision: Make problem AVIs work on DVP642”
1 Chris 20 October 2006 @ 4:06 pm
Sweet … thanks! Got this player the other day but it kept bombing on my AVI’s. It’s amazing that no one had written a quick How-To guide on making this thing work for us Mac users.
In any case, thanks for the quick tip!
2 Mac DVP642 30 October 2006 @ 10:40 am
I spent about a year fiddling with setting and hanging out in the videohelp.com Mac forums trying to get AVIs to work. The scarcity of information is one of the reasons I started writing these. I’m glad it’s of use.
3 Christian Effenberger 2 August 2008 @ 1:19 pm
HINT: Some dvd-players won’t play your AVI’s if you set anything other than “no icon” at preferences/icon choice!
4 bizzyb0t 29 August 2008 @ 11:20 pm
Amazingly, this program is even better now. I’m surprised that more people haven’t commented on this tutorial as it’s very useful for a lot of DiVX players.
Thank you for posting this